Showing posts with label clerestory. Show all posts

Tuesday, August 16, 2011

Let there be a ROOF! (and what it looks like after 3" plus of rain w/out one)

Sunday we picked up 2000 SF of hard Wisconsin maple flooring that will cover the majority of the main floor.  We also had to clean up after the storms on Saturday which left the floor standing in water.  I expected to get to the site on Monday and have most of the floors drying out but it stormed again on Sunday night.  Below you can see what happens when you have flooring material that doesn't simply absorb all that water but contains it.  We had 1 1/2" of water over most of the main floor and more that had drained into the basement.  I spent about 3 hours in the morning sweeping/squeegeeing again.  While I was doing that the crew started roofing using the Zip roof system - the interesting thing about this is that the seams are not clipped nor are they toungue and groove.  Once the sheets are all down you tape the seams using an uber-strong tape.  To bond it well you then roll it with a special roller.  The sample rolled well during the demo was very hard to remove while that not rolled wasn't that difficult.  This flooring and roofing is warranted to be waterproof for 6 months and 10 months respectively without any other protection.  Pretty impressive.

Today the crew finished the clerestory roof section and walled up the East end of the house.  We still have to wait for the well drilling rig to get behind the house before we can put up the deck and finish the framing and sheathing of the roof.  We hope to be able to do that starting Friday but a lot depends on weather and if the soil is loose/muddy on Friday when the drilling rig arrives.
Here's the flooring after cleaning up some of the standing water on Monday morning

more of the water

and yet more..

the last view with water!


The back of the house with all roof sheathing (except the unbuilt deck) installed

The guys woking on the clerestory overhang.


This is the drive view at the end of the day on Tuesday - notice the shadow on the West end which will be he covered deck.  Perfect!  you should also be able to see the small bump in the roof over the front door which is the installed skylight.  It reflects the clerestory roof in miniature.  As the crew says No mas agua!

Thursday, August 4, 2011

Clerestory up

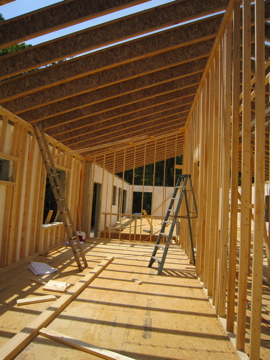
The morning saw the framing of the 18' 5" clerestory wall completed.  The afternoon was spent putting up the roof joists on that section.  You'll note the spacing on the joists is 12" on center vice the rest of the roof which is 24" on center. That's due to the long span of these joists (37') without any support in the middle of the roof.  They will be blocked and there will be a 2x4 strongback installed across the entire roof which will significantly increase the strength of the entire roof system.

We also had long discussions on the positions/use of the glulams (glued laminated beams) since they are really visual additions everywhere they go.  We agreed with the architects that we can work out the use of the beams to minimize waste and provide strength where it's needed as well as the visual accents they were intended to provide.  This is a win-win situation sinve that means we don't have to buy additional glulams (which is an expensive proposition and takes quite a long time for delivery).

What the clerestory framing looked like at 11:00 this morning - viewed from the North.


Clerestory at 11:00, viewed from the West.


Rear overhang viewed from the West at 11:00 this monring.
The view of the clerestory wall and roof up at about 4 PM.  The installation process was fascinating - one  man (Mario) on the scaffolding, one 'walking the wall at the South end of the house, and4 of us on the ground manually hoisting the beams up to Mario. once us, the overhang was measured, beams properly spaced, and nailed in place.  The installation of 22 beams took under 2 hours which included butting the front face to provide a vertical surface.  The garage will be centered on the middle window in the clerestory and the roof will intersect the wall about 4" below the windows.

.
The view from the Southeast Corner of the house with the clerestory joists installed - there are still a few missing at the junction between the gable roof and the clerestory roof.

Wednesday, August 3, 2011

Roof joists up on over half the house

Yesterday and today marked more work on the roofing system - They got all the joists installed up to the point where the clerestory windows will be.  That's taking a bit of figuring to get all the walls lined up and we're working through the installation of the glulam (glued-laminated) beams.  Currently we have 20' beams and we need one that is 24' if we are going to span from the South wall across the kitchen to the wall between the dining room and the family room.  Because we had not yet ordered that beam, there is a 5-6 week delay in delivery.  We have 120' (6 20-foot glulams) that we are working to make fit the space we have them specified.  We may do a temporary brace until the glulam can be delivered.  Part of the issue comes in that the glulams we have are 7"x11 7/8" x 20' which is not the standard size for a glulam (3 1/2' x 11 7/8") so we would have a mismatch that would be quite obvious.  We did have to adjust the position of the load-bearing wall due to the door position between the family room and kitchen - not sure how we all missed that one but it's 3' off what the plans are showing.  The wall only had to more 9" but it did shrinkhe dining room and kitchen while increasing the family room and laundry room.  Because of the window position in the kitchen we have to re-look at the raised dishwasher/wall cabinet that were going in that space between the door and kitchen window.

This is the roofing system installed as of noon on Tuesday.That gap is where there will be double  joists for skylight support in the main entry.


SI! Mario! Mario is standing on the scaffolding that will be used to put up the clerestory wall.  


 An inside view of the scaffolding and Mario setting the first 2x4 for the celerestory wall
Looking at the main floor from the Southwest to the Northeast on Tuesday afternoon. Now that's a rrofline!

 
This is the clerestory wall initial set - the roof joists will sit atop this wall and extend 2' beyond to the North (This is looking at the wall from South to North).  When we got to this point we realized the drawings we had on stie and the concrete walls didn't match.  There was a 3'difference between where the door/window to the deck was in the wall and what was shown on the drawing.  We had to move the load bearing wall 9" to make it all work. I took this picture at 7 AM  on Wednesday which is why the lighting is different.  

The "Master Suite" framed in - bedroom at the far end, walk-in closet in the middle, bathroom is where I'm standing taking the picture. Vaulted ceiling height here will be from 10' to 15' (left to right0.

Looking down the central hallway from the east (standing "in" the closet that's isn't framed yet.  The ceiling will be at 10' in this hallway but will be vaulted in the other rooms in the house.

Looking from West to East at the framing - Family room at my back,  bedroom (work room) at the far end. 

This shows how a 3' overhang (on the right side) works to shade the windows from direct sun at this latitude.  The overhang is 51" on the left which shows how much lower it covers, going below the 6 foot by 11 1/2 foot staircase window which is at about 4 1/2' off the ground.  We don't have the deck roof joists up yet (part of the clerestory roofing section) but they extend even further.


This shows how much about 17 inches of difference in overhang can make - the actual roof joists are the same length but the house is 3 feet shallower overall on the West (left of picture) than on the East (right side).  This was just a neat visual of the difference in the shadow lengths.