Showing posts with label retaining wall. Show all posts

Tuesday, September 6, 2011

Yep - it's been a week but things have happened

Sorry followers, it's been a busy week and my mind hasn't been into blogging when I get home from the site every day!  This past week we had the HVAC guys in working on the rough-in for the Geothermal system, the framers worked on the deck (finally) and we had the masons put the garage wall foundations in.  With the help of several great friends (and a rented track loader) we built a large portion of our retaining wall.  Today we had torrential downpours and tornado warnings due to Lee's remnants which turned the site into a veritable river.  The electricians slogged through the rain and worked today finishing the rough-in for the basement and started the main floor.  Still have some work to do on framing that will prevent a fair amount of work but the framing crew should be on site tomorrow to work that.

 It was a good sight to see the water all flowing across in front of the garage - about 30' from the house, into the silt fence along the West side of the site, and down into the "intermittent creek" which today really looked like "River Forks" which is the name of the nearby road.


HVAC Ducts at the ready to be installed

More ducting - this duct makes up the hard runs that go along the East/West runs supplying the rooms on the either side.

Here's the flexiduct at the ready

More HVAC stuff waiting to be installed.  Most of this was installed  by Friday.
The masons working on the footer walls for the garage on Thursday - 3 courses of block on top of the poured footings and then they parged it so it looks very much like the finish on the house.  We'll paint the exposed part with the same elastomeric paint we use on the house.
The long awaited deck roof in process as of Saturday - there are concrete lugs on the house that will hold the ledger board for the deck.  A steel rod/turnbuckle/plate assembly will tie the two 6x6 posts together for the flying roof.


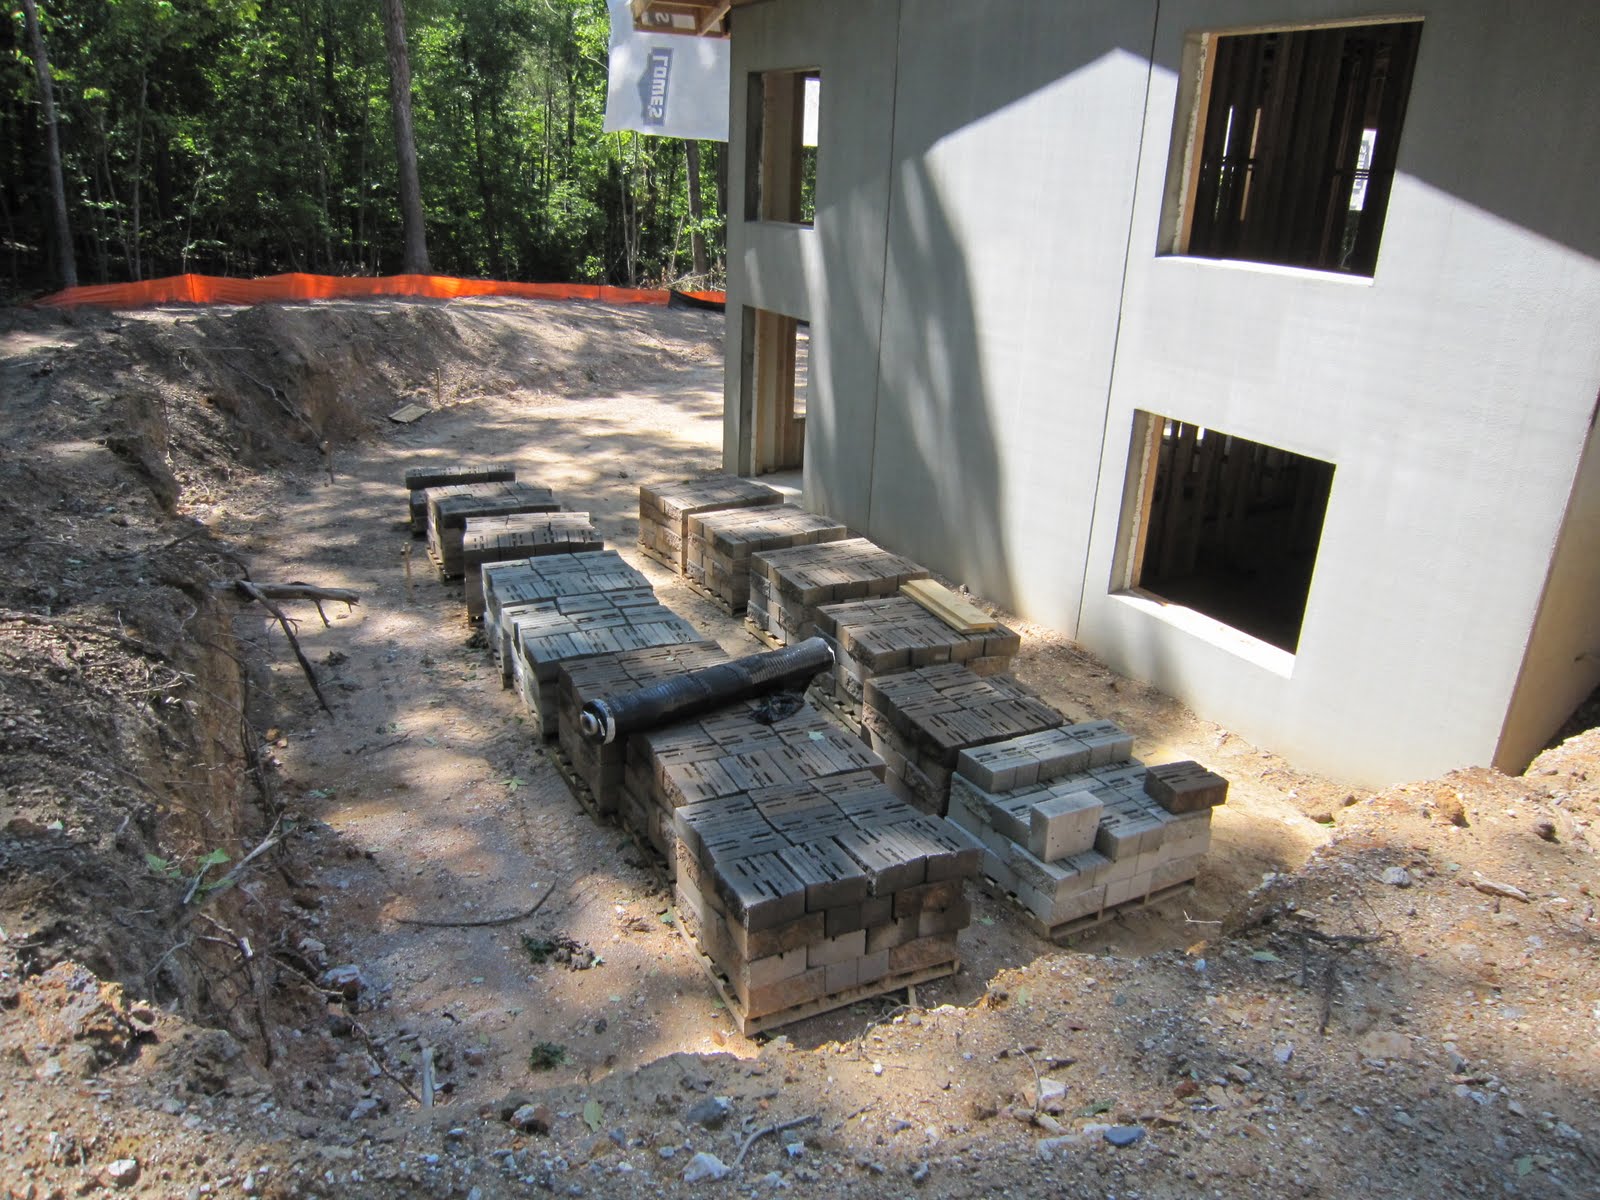
This is some of the material for the wall - a total of 18 pallets of block with 2 additional partial pallets of cap blocks.  Each pallet holds 40 blocks weighing about 65 pounds each.  This was taken on Sunday last week.

This is the wall at the end of my work day on Wednesday.  I originally built it up with a square corner but once we reached about 4 blocks high the "bond" (where the blocks overlap) had changed enough that there was a gap forming and I didn't want to cut too many blocks.  I tore it down and rebuilt it with this 6' radius curve.  At this point all work was done by hand.


This is the progress we made on Thursday after 1/2 day using a rented Bobcat skid-steer (which actually was a wheeled bobcat) for the gravel and dirt backfill.  We used the plywood to slide the fill into the right place and not have to manhandle it much after that.  

A view from the end on Thursday - there's still a lot to get done.

Your's truly setting block - once the block is set there are two glass reinforced plastic pins that interlock it with the blocks below.  The bond is the overlap between the blocks, in this case a 1/2 bond.

No, this isn't a staged shot, I did actually move dirt, gravel, and some block around with that bobcat.  Indeed it's fun but it really did expedite the work.  On Monday I alsomoved the crush-and-run around inside the garage walls as the initial rains from Lee were falling.  Plan was to have the tamper here on Tuesday to compact it but the rain made that impossible.  

This is the wall as of Tuesday Morning.  My brother-in-law Jesse helped on Saturday and Sunday (and yes, he did get to play with the Bobcat!). Jack came back on Labor Day to expertly run the bobcat and help wrestle blocks into place in preparation for the pending arrival of Lee.  About noon it started raining so we called it a good day and left the wall like this - you can see this is the "after-Lee" condition which is remarkable dry.  If you look closely at the wall that part on top that looks "loose" is actually the cap blocks Jack and I moved there as the rain started on Labor Day.


This is our "intermittent creek" that turned into a raging torrent this morning - it's actually two creeks that meet and flow into the Rocky River from our property.

This shows a bit of the water flowing across the front of the house East-to-West.  Grading guys got it just right on this one.  We still had water at the house but that was coming off the roof and it continued to settle the backfill.

That brown streak in front of the silt fence is the water running off the lot - to the right of this the water actually crested the silt fence due to the massive amount of rain coming down quickly.


This is a view from the back window looking at the water flowing down to the creek - the two silt fences did their job in large part but again, so much rain was falling the water actually climbed over the lower fence at this point.

This in interesting view - the water to the right is coming from Jack's property and it is clear.  The water straight ahead is coming from another property behind our house.  The two meet at this point and flow out to the left in this picture.  This picture is later in the day during one of our sunny spells.

I have to add a sincere thanks to both Jack, Jesse and Kevin for their help in building this wall.  I'm pretty sure that without their help I'd still be looking at a whole bunch of pallets of block wondering how I was going to make it all happen.  Renting that Bobcat was a great thing - we got it Thursday after lunch and they picked it up Tuesday morning.  We only paid for 1 1/2 days of rental but used it for the weekend and we moved yards of earth and about 1 1/2 loads of '78' gravel.  All in all we cleared 14 pallets of standard block and 2 of cap block.  I think that means something over 35,000 pounds of block got moved due to great friends and their invaluable help.  Jack's construction experience came in handy on a number of occasions as well!

Oh yeah, the raccoon was back in his comfy and dry house this weekend.  During clean-up this weekend Dee found the rascal sleeping comfortable behind the burlap hung to stay dry in the basement. We took that burlap down and today he was nowhere to be found so we think maybe he left on his on volition.  

Monday, August 29, 2011

Footings - and our first overnight guest!

Today we had the county inspection for the garage and deck post footings which went well. The concrete pour was a "will-call" scheduled for 12:00 and it showed up as scheduled so we poured and finished those footings.

The footings for the garage - pre install of the rebar


The footing on the West side of the garage


This is what happens when you place footings in the overdig area - we had to go down about 5' to get to virgin soil and actually decided to move the garage 1' further from the house to avoid having to dig down another 5' or more (the bottom of this photo is the house end of the footer on the East side of the garage)

After the pour - footings were set to level using a transit and "pinning" a leveling mark on the sides of the footer.  


These are the footings for the deck - the closest and furthest will support the posts that will bear the load of the roof (carried on LVLs that run from the sill of the wall to the beam).


A different view of the garage footing - looking from the West.  
After that we had our neighbor once again help with digging - this time it was for the footings for the retaining wall.  He made quick work of digging even though the placement of the pallets with the block were making the job a bit more difficult.  At the end of the day we had a good pad for the gravel and first course of the retaining wall so tomorrow will entail moving lots of gravel, leveling it and then setting the base course as well as the drainage tile that runs through the drainage aggregate (which makes up the 12" immediately behind the blocks.  We're still waiting for the engineer to provide cut-sections of the wall and to ensure that the drawings we have will suffice for county approval.

The electricians also showed up today to start rough-in and got the majority of the basement finished but pulled off at the end of the day due to the house not being quite ready for the complete wiring. We're hoping that the schedule of events will include finishing the deck and West end gable wall this week. That hinges on the NC State approval of the geothermal well and water well locations so we can get those wells drilled.
Cans for lights installed in the basement hallway ceiling - 4 of them.


The utility room - breaker panel will go against far wall - just to the right of the box.  Two florescent fixtures will light this room.

The closet in the office
Desk nook in the office with one can over it - switched separately from the rest of the room
Two cans light the main portion of the office


The space bedroom - 4 can lights here.

Workout room - wall outlet for TV.  Lighting will be 3 cable lights on the ceiling.


  Our surprise for the day was an overnight visitor who stayed through lunch.  Late last week we found telltale signs that a raccoon had been wandering about on the property and had left his pawprints on the griddle the framing crew uses for their lunch.  Well, after lunch today one of the framing crew discovered that a juvenile raccoon had decided that the nice cool basement was perfect for a nap.  Laughingly he used a piece of the I-Joist as his bed which is a technique our framing crew uses to catch a few winks at the end of their lunch (the flex helps soften the "bed").

Our baby raccoon - at this point we thought he was sick since he wasn't moving much and didn't  seem bothered by all the humans gathering around him.

Shortly after this picture he decided to move to the other side of the room and then he departed the basement (with a little encouragement).

Once we finished the retaining wall footings, we recalled Jack so we could dig a trench to stub out the septic line under the deck.  Tomorrow the plumbers will finish that drainage line and then we'll start on the deck and gable end wall in a day or two.  Also scheduled for tomorrow is the rough-in for the HVAC (geothermal units) throughout the house.


Thursday, August 25, 2011

Plumbing (last week), footings for the garage, and blocks for the wall

Last week (I somehow missed posting this one) they did the initial rough-in for plumbing.  Some of it they were unable to finish like the master bathroom (they needed the tub to get the rough-in exact) and the kitchen because we were still waiting on the kitchen design to be finished.
Plumbing rough-in in the basement bathrrom
Another view of the basement plumbing rough-in.  the shower is at the far end, controls are on the knee-wall and shower head is on the left.  Toilet right in front of the knee wall and then the vanity in front of that.


This has been a pretty slow week at the site awaiting the well-driller but today we started digging footings for the deck on the West end of the house. That deck is crucial to get the final gable end wall and roofing on.  We also dug footings for the garage today and had a load of crush and run delivered for the garage.  We have scheduled the footing inspection on Monday and the concrete folks will come next week to pour the footings.

One thing I have to mention - it's great to have a neighbor like ours.  He's got stuff that most guys would drool over like a Kubota backhoe, a hand tamper, water barrels, construction calculators and a cement mixer.  We were initially planning to hand-dig the footings but Jack was available and made short work of carving out 5 footing holes for the deck and about 100' of trench for the garage footings.  He also used the loader to add more dirt to the backfill areas that had settled and he pushed the crush and run around to make our work today easier.  I think we'd probably still be digging the footings if we'd done this one by hand.  Thanks Jack!


Ok, I just had to add another shot of the beams down the hallway, and you can see the skylight well adding the glow to the center of the house.
Here's the plumbing for the Master bathroom as viewed from below


Here's Jack working on the footings for the deck - nice toy!
And here's the beginnings of our garage - footings will be installed next week then we'll build a CMU (concrete block)foundation wall and a stick-framed wall on top of that.

More of the deck footings - once we get these in and the deck framing up, we can finish this end of the house

All I can say is THANKS JACK! 


And here's the site at the end of the day after Jack made easy work of the digging - you can see the roof isn't complete to the West (right side of this picture)


 A partial shipment of the retaining wall block was delivered late today - we have 19 pallets coming and only 6 1/2 were delivered today - that's 160 of the colored blocks and 113 of the gray (footings) block.  Tomorrow the rest of the block should be delivered and we'll get the washed rock and gravel delivered to make up the 12" of backfill which goes between the wall and the compacted earth.  There's a roll of geogrid which will go at 2' intervals up the wall and runds between 5 1/2 and 6 feet back into the ground behind the wall.  There were also several cases of the break-off pins that complete the system.  Tomorrow's delivery will include top caps that we'll use to finish the wall.


This is the "Canyon" color - it' matches the soil colors pretty darned well!  Each of the blocks weighs about  87 pounds so after lifting 700 plus of them, we should be in pretty good shape!  no need to go to the gym other than to sit in the hot tub on days we work on that wall!


This is the first 6 1/2 pallets of block.  40 blocks per pallet.  Gray is for the buried footing, the "Canyon" is the rest of the wall.  The black roll on top is the geotextile fabric.

The first 6 1/2 pallets viewed from the top of the 'wall' that will be retained.
This is the geotectile - 150' long by 6' wide.  It will be used to tie the wall into the soil and gravel backfill which in turn supports the load on the wall.  We also have to put drainage ports every 25' of wall.

Sunday, August 14, 2011

Transformation of the site - and Window/door delivery scheduled

The end of this week showed a significant transformation of the site - the framing crew finished one gable end, the junction between the gable roof and Clerestory section, the framing for the skylight box, and a large number of the interior walls.  Saturday was planned to be a roof sheathing day but mother nature had other plans - it started raining early and continued heavily for most of the morning.  We will now attempt for dry-in on Monday which is also rough-in for plumbing and close on the heels will be HVAC and then electrical.  Lots of decisions needed in rapid fire succession to keep the construction moving out.

  We received the confirmed delivery date for our windows set this week - it's now scheduled for 13 Sept.  Because we are getting our windows shipped at the same time as one other project Anchorage is working on, we saved a significant amount on shipping but until we get the final bill we won't know.  Part of the uncertainty is what the world Markets have been doing and the exchange rates that could impact those costs.  We did order the German tape systems so this will be an interesting experience.  I will try to photograph and video all the installations so folks see how different the installation is than typical US nailing flange installation.  As you've seen in most pictures our the window and door "framing" is concrete vice the typical lumber frames used in the US.  One thing we do have to remember is that our delivery date is based on normal customs processing - there are stories of folks who had to wait a long duration due to someone adding a gift to the container of a case of alcoholic beverages which wasn't declared on the customs form.  Now that's the epitome on the Law of Unintended Consequences!

The other change that happened was the Wilkerson crew returned with a dozer and dump truck and loader and they moved lots of earth, backfilling the house, grading the cleared area, and finishing the carving out of the East side walk-out where we'll be building a retaining wall.  We are currently waiting for an engineered solution (over 4 foot height requires that) and cost estimate for the block - we're looking at VersaLok standard size block in a mottled color (Canyon from Johnson Concrete in Willow Spring NC) that matches the soft rock colors very well.  Hopefully we'll be able to start that wall this week - and maybe get a large part of it completed.  The challenge will be placing the block, geogrid (mesh that extends 5 - 6 feet back into the ground from the wall), and backfill all by hand.  Each block weighs about 80 pounds and I expect we'll need about 750 of them!  Recommendations from the engineer were to use washed rock for the backfill and in addition we are required to have drainage installed every 25' of wall.  The interesting part of this discussion was that the wall will "flex" a bit over time - it's designed that way to prevent complete failure and the geogrid/backfill allow for drainage and flex without collapse.


The finished gable end and a view of the near-final grading from the  East edge of the cleared area.  Hard to see in this picture is the 8' drop between the camera and house.

View from the SouthWest corner of the cleared area after near-final grading. Note the "raised" deck now looks much closer to the final grade than it has in the past pictures.


View from the West edge of the cleared area - this photo shows the multiple roof lines that will be present.  Missing from the structure at this point is the garage which will attach on the left hand (viewed from this angle) corner of the house and extend North (left).


A view from the East.

View from the SouthEast.

This shows a better picture of the walk-out to the retaining walled area  from the South.  That wall at the far side is about 8' tall for perspective.


The finished framing for the skylight.  That house wrap is there to protect the beams from inclement weather and was reattached after this picture.

Looking down the front (North) wall of the house at near-final grade.  That dirt piled up is our topsoil that will go down near the end of the project.


This is the house viewed from the driveway (NorthEast).


A view from nearly due South of the entire back of the house - hard to tell in this picture but there's about 2' of drop between the house and where I'm standing to take this picture.
The next thing that happened was we decided on a geothermal contractor who will use our dry well for part of the requirement and will drill one more well for the geothermal heating.  The well driller will also drill for water for us - we've moved locations on the lot and upon further investigation, it looks like into another soil type.  The county soil survey shows 3 different types of soil on our property which may be a good thing or may be a bad thing.  The well location for our neighboring houses all seem to be in the same soil type so that may change the location of our potential well but we have to discuss with the well driller to see what he thinks.  There's always a dowser option but we have yet to find one in the area.  The unfortunate thing is they put casing in the 606' well down to 67' which means that part of the well is less efficient for geothermal.  Drilling out that casing is costly and risks losing valuable equipment and maybe use of the well.  The contractor will fill in part of the well with gravel and only use the top 350' or so. This is due in part to the standard geothermal well pumps only being good up to that depth.  We'll drill another well near (25' separation) the old well and then the water well will go elsewhere. Right now we anticipate the well drilling operation to be late in the week.  The good news is there seems to be a break in the high temp days and we may "struggle" to hit 90 degrees this week.  That's really good news because it has been insufferable for the last couple of weeks.