Showing posts with label concrete walls. Show all posts

Thursday, July 28, 2011

Well, but no water - but we do have walls in the basement and a flooring system for the main level

Today brought the bad news that we'd hit the magic mark for a well depth without finding sufficient water to use.  They drilled through a large amount of slate and some other softer rock but throughout that period, they were only able to find about 1 quart per minute flow rates.  The magic number we reached was just over 600 feet which is much greater than any of the other houses in the neighborhood drilled and they have flow rates from 4 GPM to over 25 GPM.  We now have to determine the next steps which may include fracking the well to see if that breaks enough rock to get a decent flow. Our other option is to use this well for ground source heat pump (geothermal) and drill another well elsewhere on the property  We're waiting for the fracking expert to provide an assessment and cost details before we make the decision.  What the fracking process does is blast pressure into the well at set intervals to attempt to break the rock and open channels for the water to flow into the well.  This is not the fracking that uses chemical solutions to extract natural gas from the shale and has raised a huge level of discussion here in Chatham county. (in other words this is not the same as the controversial version of fracking)

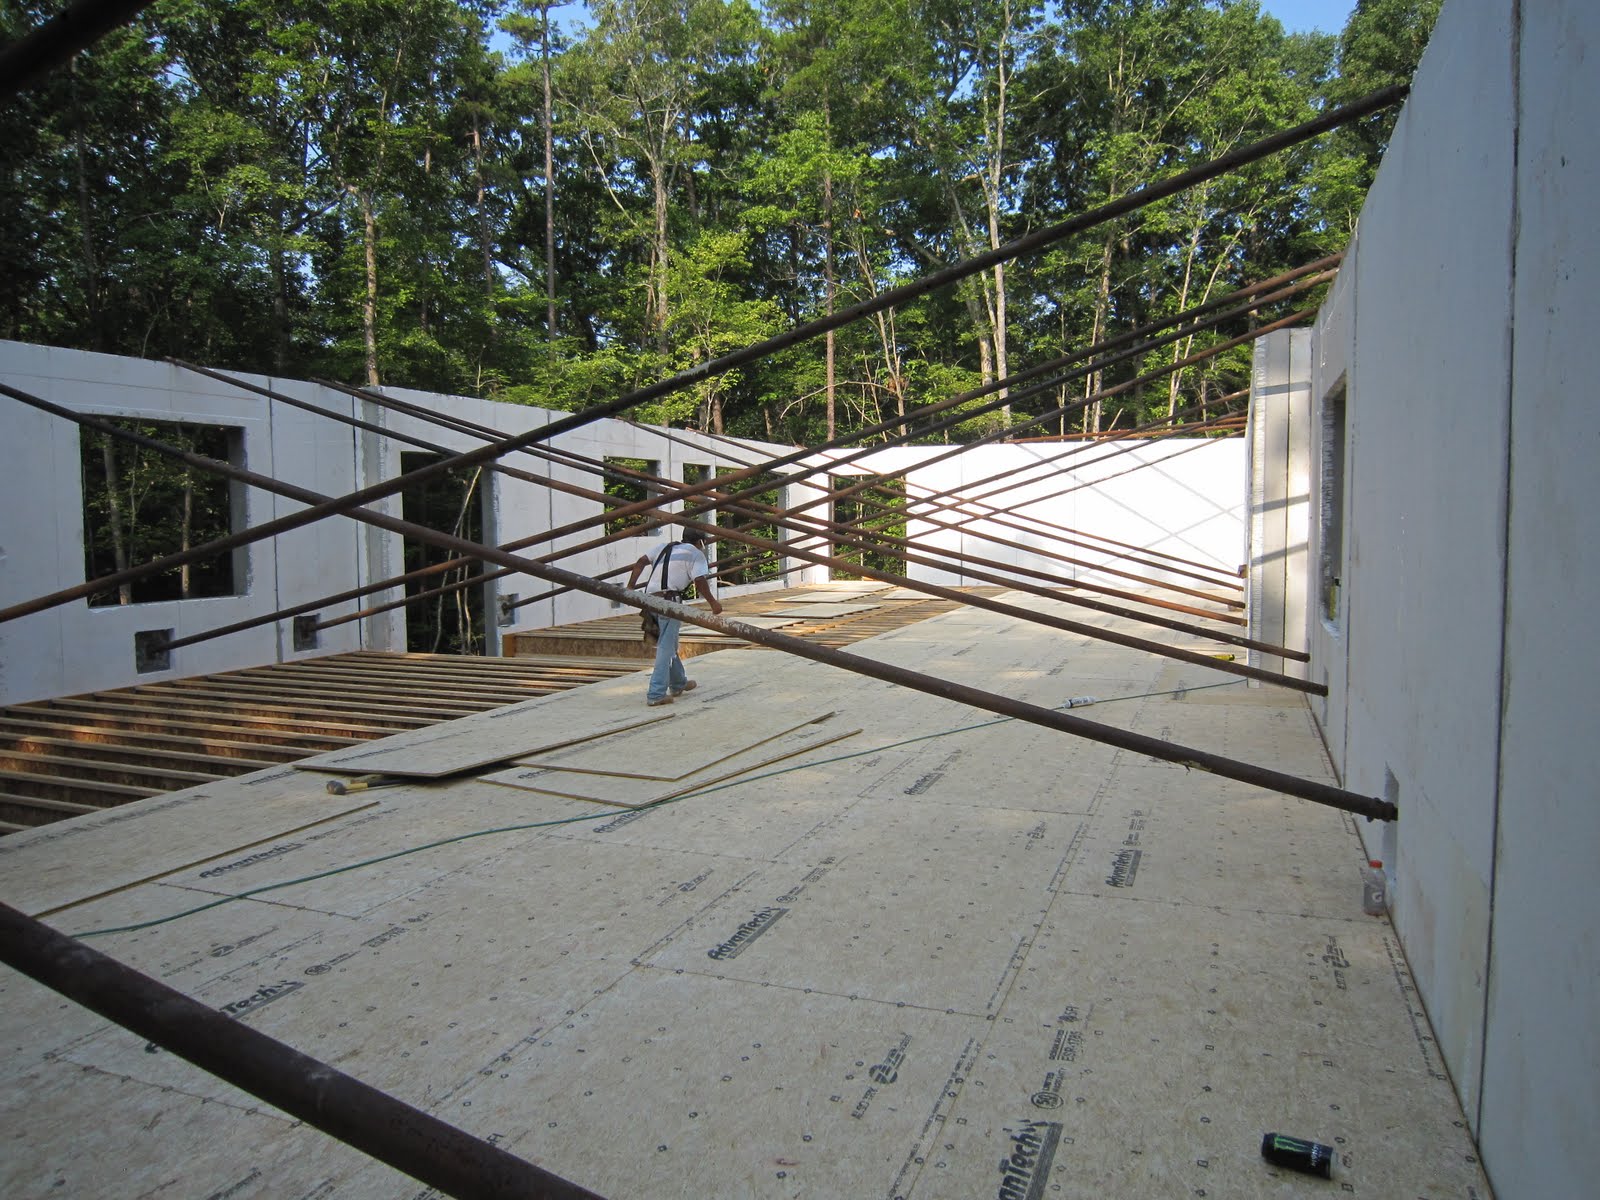
On the bright side we now have a flooring system throughout the house and they also put the entire main floor system on this morning.  Once that was done the wall braces were removed opening the house up.  Tomorrow we should take delivery of the next installment of lumber which will be sued for the stud-walls and roofing system for the house.  That will be a welcome thing since the heat wave has continued.  It's hard to imagine but standing inside a styrofoam cooler on a bright sunny day that is also over 100 degrees simply intensifies that heat.  We've been providing water and Gatorade for the framing crew to ensure none of them drop due to heat exhaustion.

The business end of the drilling rig - note the purple water which signifies shale.
This was the state of the system yesterday morning - most of the basement walls were up but the floor joists had yet to be installed


This is the view fromt he basement after the floor sheathing had been installed on 1/2 the house

The view from the front door - there will be a wall about where the seam  on the wall panels is to the right of the large window.

This is the view from the top of the staircase - most of the dirt you see will be  gone since it's the backfill for the  overdig so it will be a clean view of the woods behind the house.
Here's the view from the family room window wall.

This is the last time you'll see these bracing poles on the house.  Shortly after this picture was taken the flooring system was complete allowing the braces to come down.

This is the same view without the bracing and with all the sub-floor installed.  The missing squares of foam will be replaced in the morning before they start on the stud-wall that will again lap around the inside of these walls.


This shows that you can get a lot of bvehicles on this particular site - we had the drilling rig, the support vehicle, the grouting truck, the crane, the flatbed a pickup, a van and a sedan all on site at this instant.  All that was missing was the portable toilet service truck that showed up a short while later!


Wednesday, July 13, 2011

Waterproofing, pre-slab prep and underslab rough-in for plumbing.

It's been a busy week - Ideal set the replacement panel yesterday afternoon so all the walls are now in place.  Kevin and I spent the better part of yesterday and part of this morning caulking the seams in preparation for the slab pour.

The plumber was on site yesterday laying out the pipes for the downstairs bathroom (shower drain and toilet) so we had to have specific information for him including the toilet rough-in size (10", 12" or 14") and where the drain would be in the shower.   We were prepared so that wasn't any surprise - and the plumbers ran their test water column in prep for the inspection by the county today.

Today the concrete slab crew showed up to the do the gravel work in prep for setting the foam insulation, rebar, and vapor barrier.  This is another awesome crew - you can tell by the look of the gravel when they left the site today, they do extraordinary work.  We had a small glitch when the supplier called today saying they can't get our high density foam until Tuesday.  What that means is our pour will now be scheduled for Thursday to allow time for the final work on the pre-slab and the inspection prior to the pour.

I spent the day waterproofing the sub-grade parts of the panels 6 50# sacks of Thoroseal mixed and applied with a roller.

The front of the house which faces due Nortn

East side of the house

The cracked panel comes out

and the new one swings into place

That's 14,000 pounds of panel!

Here's what it looks like in prep for the foam and rebar - Clayton's team worked that gravel into a carpet!

The black "bucket" in the gravel is the waste lift station for the basement bath - drains for shower and toilet are the white PVC to the right of it

Just for perspective this is the house from overhead - looking East to West.

Friday, July 8, 2011

We Have WALLS!

Today we set the last of the wall panels.  Yesterdays' thunderstorms continued until after 4:00 so the crews called it a wrap and returned to the site today at 6:30.  By very local reports over 2" of rain fell on the work site yesterday and when I arrive this morning, the silt fence was doing it's job very well - silt had been trapped and formed a loose "quick-sand" like muck about 2' deep at the fence.  When we cleared the mud build-up the drainage pipes from the gravel bed were flowing with clear water which was a great sight.  All in all it worked well, no huge cave-ins of the dirt onto the gravel meaning the set was not delayed.  The "lap pool" was again filled partially with muddy water when I arrived but throughout the day it drained.  Rain began falling again about 3:15 and didn't let up before I left the site.  The good news was no lightening today so they could get the final panels set - albeit a bit wetter than they'd have liked.

 The crew began setting the first panel just after 7:00 AM and set the final section (the "beam" over the window opening for the family room) just before 4:00.  I left the site at about that 4:30 but the crews were still closing down their equipment and packing up the cranes to move them off the site.  I got about 2 miles up the road and it was dry and sunny!  

The site at 6:30 AM - 6 panels installed yesterday, 19 to go today

Minor collapse of walls due to 2" of rain.  The drain tiles did their job keeping the  water flowing away from the gravel base.

Here's how you get two trailers back to the plant with one cab

You set one on the other and drive them away strapped together!

9 Panels up at this point

Wall walking at it's best.  That "string" you see is the measuring tape used to check square of the panels.  9/16" off at this point on the diagonal which equates to about 9/32" side to side over 36".   If you zoom in on the photo you can see the metal ICFVL (insulated concrete form vertical lateral) plates spaced between the windows - they're the gemstone shaped plates (3 of them) just above that bottom window opening.  Those are where the floor system will attach to the walls with LVLs (laminated veneered lumber) attached in a band around the walls.

Looking through the East window to the wall-set team on the man-lift

13 Panels up at this point - and the sun is shining bright at this point!

Getting the man-lift out of the site - since it has no suspension it has no traction on uneven ground and couldn't get out of the hole under it's own power..  

The North Wall completely set

Looking though the front door entrance and out the South side 6' wide by 11 1/2' tall stairwell window.  That soil you see will be used on the backfill so it will be out of the picture.  What you can't see is the two specimen white oak tress you see from this position and the rain-swollen intermittent creek you can see from the "deck" position.  
The last panel on the south side - minus the beam that goes over the 12' wide by 7'6" tall window panels in the family room.

Joe Don's nerves are starting to build - two panels left to install and this one is in the bag!

The last panel on the way

Setting the last panel in place - it's still on the crane but it's already clear this is going to be a perfect fit!  That's the french door to the deck and the lugs (blocks on the sides of the walls) are the supports for the deck.  Backfill will come up to within about 3' of the deck once complete.  

This is the last piece of the puzzle - it's the over-window beam and....

It's a PERFECT FIT!  That's the door to the deck on the right, the 7'6" tall by 12' wide window opening on the left and the French Door to the patio you see through the window opening.

Jeff taking a bit of a break before making final adjustments to the walls for plumb.  This is the due-South facing back wall of the house.
This is that final "tweak" to get the panels plumb and level on the West wall of the house.  What you can't really see in the picture is the skies opened up again and it seemed like another inch of rain fell in the 45 minutes I stayed on site.  They had to pack up their gear in the rain and get two cranes and their gear all off site.

We have to extend our sincere thanks to the crews that set manufactured, transported and set these walls.  The operators who swung these 14,000 pound panels into position like they were Lego blocks and the entire crew who prepped the site, set the walls, attached them and cross-braced them and made this look easy.  It's hard to believe that only last Friday the first walls were being poured at the Ideal Precast site in Durham and today we were done setting the walls.  By my rough calculations they set somewhere between 250,000 pounds and 320,000 pounds of walls in two days!!  This has been an amazing process to watch and be a part of!

Footnote:  During the scramble to avoid the lightning and winds during yesterdays thunderstoms, one panel was set back on the flatbed face-down and it experienced some cracking (due in large part to flexing the panel against the designed stress direction and also since concrete isn't completely cured for much longer than the 7 days since this panel was poured).  Due to the location of the panel, it was set in place to allow the rest of the panels to be set.  Ideal is making a new panel today and the crane will be on site to replace that panel on Monday at 10:00. Talk about a great company to do business with!!  Absolutely no impact to the project progress - we had a planned down day on Monday before we start pre-slab rough-in and slab-prep work on Tuesday.  We'll also do the code-mandated waterproof coating on the below grade panels on Monday and Tuesday.

Wednesday, July 6, 2011

Walls are poured and ready to set!

The forms for the West half of the house - there's about 124 linear feet of wall here!
Today we visited Ideal Precast in Durham as they were pouring the last half of the walls.  The first set of walls was loaded on the trucks for transport to the site.  Our total panel count will be 25 including some smaller stub-walls and a beam over the large bank of windows in the family room.
This are the panels for the large window for the family room.  That wooden frame is the window opening. one panel below the window, one beam above, and a panel on either side.  This is a 12' wide, 7'6" tall window with a door (seen where the worker is standing). 
This is a "plain" panel for the west end of the house.  The slots in the foam become the ribs of concrete with rebar for strength.  The top layer of foam (outside) is largely recycled content while the bottom layer (closest to the living space) is virgin foam.  This set of walls required a full truckload of virgin foam!

These are the panels poured last week - one in the air being lifted to the flatbed  You may not see it here but there is actually a slight flex in the panels - they weigh about 12,000 pounds each.  The added 'beams' for panels with windows makes up for the openings to the weight is the same.

Second panel being loaded onto the truck - foam spacers used between the panels. These panels are guaranteed to 5000 psi - but we suspect they would test out much higher due to the quality control and painstaking work done by the crews.

This is the first panel already poured. The concrete block on the end brace the metal forms (with a release agent sprayed on them).  The channels you see in the lower right are other forms not being used for this pour.  The base being used is one monolithic concrete pad for a  sturdy, level surface.

The hopper being used to pour concrete into the forms.  You can see the top side is the outside of the panels and that first panel only has the bull-float finish on it at this point.  


Concrete is mixed at the end of the forms - it takes just about 90 seconds to mix enough (1 1/2 cu yards) for the hopper) and then it's moved to the proper panel and poured.  It's amazing how accurately they can aim the concrete and hit very narrow channels!  These guys are real pros!

A later wall section in the process of being finished - an air-powered vibrating scree is used to set the initial finish, a bull float and hand trowels are used to put the second finish on it.  When the concrete is just at the right moment of curing the broom finish is applied.

Grey shirt worker is hand troweling the edges around the window, red and light blue workers are working the power scree, white shirt is holding the bull float.  We left at this point which as the first 46' of walls poured.  78 feet more to pour and brush finish.


Tomorrow we hope to set the walls - today we found that some of the dig had collapsed due to heavy rains so some work was done to repair that and dig a ditch to divert the potential rains tonight and tomorrow.


This is the site as the crews are working to repair the collapse of the wall and prep for the all-set tomorrow.  yes, that's water in the strip footing (as Kevin said "your new lap pool is in!") but so far this soil has drained pretty wall. There is a ring of pipe under the gravel that drains to the south - this section was a bit lower due to preparing for the strip foundation to support the load bearing walls.