As previously mentioned, the windows and doors are installed using a system that is different than we've seen in the US. The German solution is to put an expanding foam tape on the frame of the window (sides and top only, bottom is left only with the sill strip), the window is quickly placed into the opening and adjusted for plumb, level, centering left to right and height. Holes are then drilled into the concrete and screws are used to permanently attach the frame. Once this is done a strip of air/water sealing tape is placed along the sill strip extending beyond the expanding foam tape on either side. One side of tape (inside or outside) is then glued down, a spray-foam sealant is applied to the space under the window and between the two layers of tape, and then the second air/water sealing tape is glued in place. The glue used for the air/water sealing tape is a mastic and it appears the spray foam is quite similar to Great Stuff. My skills at taping, gluing and foaming will be tested in the coming days when we do the first blower door test on the house.
 |
| This is the expanding foam tape (a leftover piece) - the right side is about 1 1/2 inches top to bottom at the full expansion. |
 |
| This is a picture of the same scrap next to a roll containing 6 meters (about 18') of the tape. |
 |
| This is the water and air sealing tape used on the bottom of the doors and windows. The yellow strip is a double-faced tape section which has glue on both sides. The tape is installed with the lettered side away from the sill and the smooth black side nearest the sill. |
 |
| The top tube is the spray-foam while the bottom is the glue. The foam is applied using a gun very similar to the Great Stuff Pro guns used for their spray foam. The glue is applied using a standard caulk gun - the plunger end in this case is sealed with a pop-top and then you puncture the other end, screw the applicator tip on and start applying. This glue is very stiff so we used a Ryobi One Plus power caulk gun to prevent blistering our hands as we applied the glue. |
 |
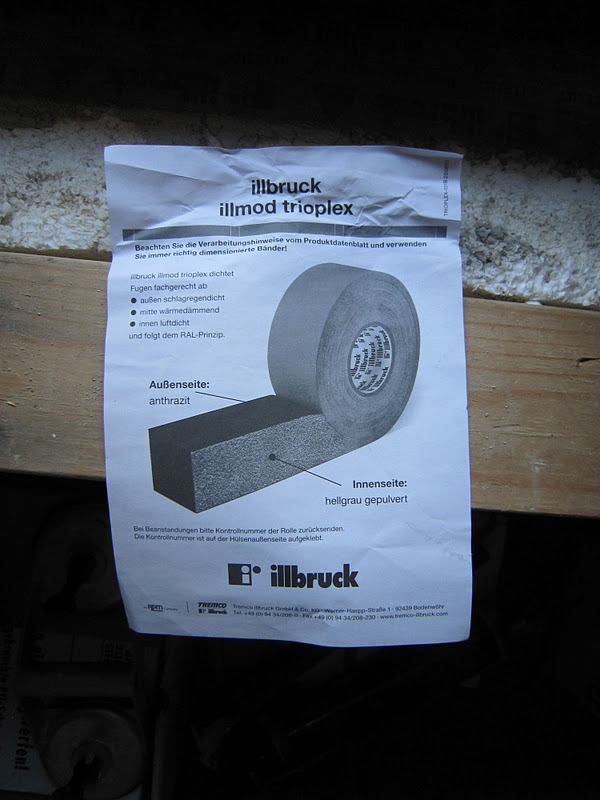
| This is the instruction sheet for the foam tape - one thing we found out is that that tape has two different sides as shown by the two pointers on this sheet. One side says "AuBenseite" which is translated to outside and the other is "innenseite" which is translated as "inside." The outside has a special coating that seals it better agains water infiltration. We actually had a couple windows installed with the tape reversed but the factory advice for that was simple - use some of the glue that we used for the tape to seal the outside of those taped section. |
We have two more doors to install so we may be able to get actual pictures of the installation to help understand the process.
As mentioned earlier in this post, we'll be spray-foaming on Wednesday and as part of that process we'll be conducting our first blower-door test to find any leaks. The spray foam will be applied to the underside of the entire roof as well as all the soffits and gable end walls. We'll also apply the foam to any panel seams and exposed concrete (only at those inside corners where the width of the house narrows). We've already sealed the outside of the gable end walls and soffits with house-wrap, glue, and tape (a mix of Zip roofing tape, house-wrap tape, and window flashing tape). There are still a few panel joints that need sealing on the outside which we'll do on Monday or Tuesday since we're low on the required caulk for that.


No comments:
Post a Comment