Tuesday, October 25, 2011

Deck goes on and power run to the meter base

Well, yesterday was scheduled to be the inspection of the geothermal and well but not much else. Inspection went off without a hitch and we were getting prepared for the spray foam (scheduled for today) but were surprised when the power company showed up to trench for the power from the post to the house.  They made quick work of the trench but did manage to snag the drainage tile that runs from under the foundation to the slope in the back of the house.  They only damaged one of the two lines and once they were finished with the cable (which they put in PVC conduit) they left the trench open where the drain tile was so we could repair it.

  I've included more pictures of the house from all angles to show the perspective the deck now adds to it.  It's pretty amazing how much it changes the look of the house.  We still have to dig the footings and put the uprights in but by doing the install this way we get the deck sized appropriately and then dig the footings to match the footprint of the deck.

the crew showed up at about 2:30 to begin preparations for spray foam.  They sealed off the windows by adding to what we had done with housewrap and sprayfoam by stapling a plastic film over all the windows, doors, and exposed beams. This was to help prevent the inevitable spray-foam "dusting" of particulate on those items.  As the foam is sprayed on in a liquid form it creates a slight mist that settles on exposed surfaces - and we wanted to take extra precautions on the vinyl windows to prevent that mist from attaching itself permanently to the vinyl.  Tomorrow brings the real spray-foam application and then we will conduct a blower-door test on the house for the first time to assess the air leakage.  We have also scheduled a more formal multi-point test on Thursday to help us pinpoint any leakage areas so we can seal them before they blow in cellulose on Monday/Tuesday next week.  Today we prepared the Nanogel blankets for attaching them to the butt-joints where concrete is not covered by foam on the interior of the house (about 10" wide, running from the base of the walls up through the knee wall at the top).  We'll also spray-foam to fill the remaining void in those areas where possible so we get max insulation value.  Tomorrow we'll also dig more of the deck footings since we don't want to spend too much time in the house while they're spraying the foam (though we will have some pictures).  We'll also finish repairing the drainage tile since this weekend is supposed to be a bit rainy.


The well and goethermal trenches - well is the one at the base of this picture and geothermal comes in from the left then they both follow the same trench to the house.

Looking up towards the geothermal well - the loop (2 pipes) can be seen at the bottom of the trench here.

This is the geothermal well (at the base of the picture) and the loop running to the house.

Looking down at the geothermal well - note they simply snapped off the PVC sleeve and ran the loop over the edge.
.
Here's the recent power trench with the PVC conduit installed (you can see the cable coming out of the meter base on the left) and just where you see the start of the conduit in the trench is the gravel that contained the drainage tile. 

View of the house from the North East corner.

Looking from Northeast to Southwest.

This gives perspective to the deck and shows how it changes the otherwise plain looking back of the house.  We did manage to eat lunch on a 4x8 sheet of OSB placed on the deck framing yesterday.  

Another view of the back - looking from Southeast to Northwest.


The full back of the house.  This picture was taken at about 5:00 in the afternoon.

Looking at the deck from the Northwest corner.

And the view from the West.


Looking down the back of the house - from the Southwest corner.  The deck is about 5' off the ground at the close end and approaches 7' at the far end.

Friday, October 21, 2011

Rough-In inspection passed, wells are plumbed, deck goes on, facia and soffit complete

Yep, it's been another very busy week this week.  The framers worked on Saturday to finish installing the hardi-board and hardi-panels on the facia, soffit, clerestory, and garage.  The look of the house changed significantly with that addition.  They also worked on the pocket door to the living room but they second guessed their work and changed it from the double (as it was supposed to be) to a single 2'6" pocket door.  Needless to say that looked like a dungeon even without drywall.  When the framers came on Monday to finish more of the punch list, they successfully made the double pocket door as intended, which looks much better.

Tuesday brought another day of rainfall so little took place on site that day other than a few odd jobs and creating a good punch list for the carpenters.  DeeDee spent quite a bit of time using house-wrap to seal off the tops of the windows where the 2x4s were standing away from the insulation in the walls.  This was done mostly to prevent the "misting" effect of the spray-foam from getting on the windows and vinyl frames which would make a lot of extra clean-up work.

 On Wednesday morning when I arrived at the site there was water on the floor in the kitchen/hall and dining room.  When all was said and done, we agreed this was again perfect timing for the rains to come; had we sprayed the foam and then had the leaks, we would have a bigger challenge by either not knowing about the wet foam or having to remove it and start over.  Given that we were not initially sure where the came from we called off the spray-foam installation scheduled for that day - we simply didn't want to risk getting the Icynene wet.  Climbing on the roof I found some suspect areas where the guys working on the roof have scuffed the joint-tape on the Zip roof system.  Shortly after that it started raining again and we were able to pinpoint the spot in the dining room where the tape had been 'breached' and allowed water in.  Since the rain continued for the majority of the day on Wednesday we had to wait until Thursday to fix that section of tape.  Kevin did the tape repairs and we're now scheduled for spray-foam on Tuesday next week.

Thursday we had 7 framers on site working on the window trim boards (hardi board) as well as framing the deck.  They divided into two teams - one working on the window trim and the other working on the deck.  They ran out of material for the window trim as well as some of the necessary boards for the deck so today they spent the morning finishing that off.  We had them skip installing the trim boards on the main entry door, the French door and the back deck door because they have lower thresholds that meant the hardi wouldn't fit.  We're working to get metal thresholds for those doors that will be attractive as well as functional.

 The team working on the deck managed to finish off the framing save installing four 8' joists that we still need to get.  We won't install the decking until we have the footings poured and the support posts installed.  For the footings we'll have to dig down to "virgin" soil which will mean anywhere from 2' to 6' of digging due to the slope of the land and the grading that was done.

 On Thursday we were surprised by the Aqua Drill guys showing up to install the geothermal loop (two 610 foot pieces of pipe that were joined by a u-connector at the bottom) and the well pump, pipe and electrical connections.  The 610 foot long loop extended up the driveway and down the road another 300' - to install it they attached a couple of fence posts to add weight to the bottom, installed it until the air caused it to float.  Once at that level they pumped water into the loop to add weight and then three guys wrestled to push the remaining pipe into the well.

Today the Aqua Drill team installed the pump/line/electrical into the water well and then trenched from both wells to the house.  They then punched 3 holes into the concrete wall below ground level to get the geothermal loop and water supply into the mechanical room.  they caulked those holes heavily and also installed a pressure storage tank to prevent the well pump from cycling on/off too frequently.

One other visitor to the site on Thursday was the County Health Department inspector - we had asked for clarification on the septic field placement since there was a bit of confusion between the copy of the permit they provided us recently and the surveyors marked septic field.  The permit appeared to only show the upper half of the field which is the repair area while the surveyor had marked off both the main area and the repair area.  The inspector confirmed that the intent was to use the field as marked by the surveyor with the "lower" half being the main and the upper half being the repair area.  We are now scheduled to get the septic installed around 3 November.

We placed the deposit for the standing seam roof this week and it was ordered yesterday. There's a 7-10 day lead time for delivery so we're now schedule to get the roofing installed the week of 3 November.  That will definitely make this a completely gray house so we're anxious to get paint on the house.  We did test a few samples for the body of the house, the facia, and the trim.  The house and facia colors seemed about right which the trim color was a shade or two too light.

DeeDee and I spent the afternoon today doing some site cleanup and caulking some of the remaining panel joints - we're down to about 4 sections that are about 10' each.  Once the caulking is complete and we have the fire door installed the house will officially be sealed off. We'll blow the cellulose in shortly after that - don't want risk any water infiltrating that cellulose!


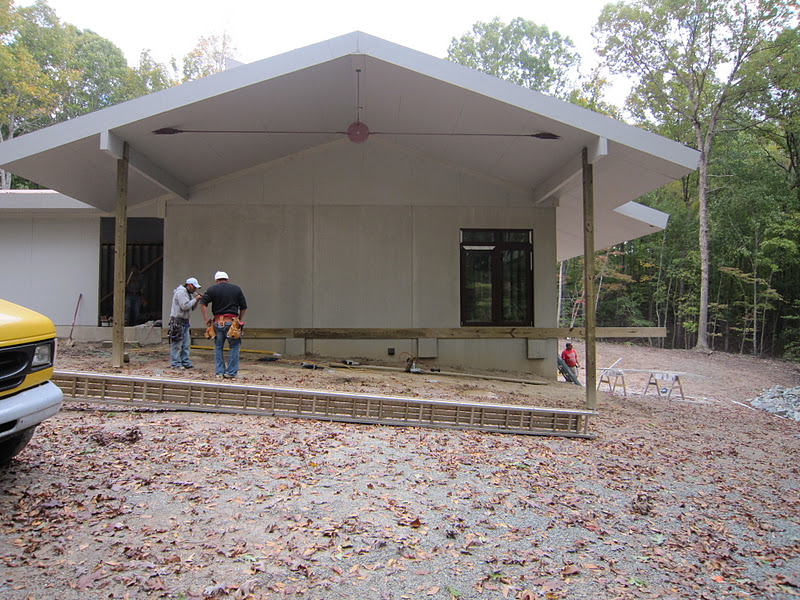
Driveway view - again.  This is before any window trim installed. 
View from the front of the garage.

Garage and roof of over the deck-to-be

The space where the deck will be (see below pictures with the deck installed)
Rodrigo's crew working on the window trim.

If you count the ladders I think there are 7 here - this is the crew working on the window/door trim installation 
Ledger board is up for the deck


This is the geothermal well in the process of grouting.  The two pipes to the left are the ground source heatpump loops while the pipe to the left is the grout machine pumping in the thermal grout (cement).  

That's the ground machine behind that tree.  it's essentially a concrete pump that mixes the concrete as it pumps it into the well. the spool of pipe is pulled out 20' at a time as the grout is poured into the well. Water is forced out the top of the well as the grout goes in.

Here's the water coming out of the "dry" well as it's being grouted.

More of the water.


And yet more...

Here's the deck as it stood at the end of the day on Thursday.


The initial choices for house color and trim color.  That trim color isn't what we hoped it would be so we're trying to figure out what is next.

Here's the single pocket door that should be a double - and the header should be open for the transom (stained glass) that will go above the door.  It's now properly constructed and we'll post a picture when we get one that's sufficient.

At the well head and ready to push 600 feet of heat-pump loop into the hole.

The two pipes making up the loop stretched up the driveway, around the corner and another300 feet down the street.


Here's the special geothermal blend of grout.  Billy's estimate was 22 bags to fill the well and when all was said and done they used, you guessed it, 22 bags.

Punching holes in the side of the wall to get the water and heat-pmup lines into  the mechanical room.  He was about 1" too far to the right on the first hole and caught not only the rib (7" of concrete vice 4") but a stud.  

Some of the limited "red dirt" on our property - this is the stuff they look for when boring for the septic system but this is in the wrong place for that.

First trench is to the right - the two trenches will later meet up at the right side of this picture. 
That's the pressure tank and water pipe in the background and more of the red dirt in the foreground.


Friday, October 14, 2011

Expanding Foam Tape, water/air sealing tape, glue and foam

As previously mentioned, the windows and doors are installed using a system that is different than we've seen in the US.  The German solution is to put an expanding foam tape on the frame of the window (sides and top only, bottom is left only with the sill strip), the window is quickly placed into the opening and adjusted for plumb, level, centering left to right and height.  Holes are then drilled into the concrete and screws are used to permanently attach the frame. Once this is done a strip of air/water sealing tape is placed along the sill strip extending beyond the expanding foam tape on either side.  One side of tape (inside or outside) is then glued down, a spray-foam sealant is applied to the space under the window and between the two layers of tape, and then the second air/water sealing tape is glued in place.  The glue used for the air/water sealing tape is a mastic and it appears the spray foam is quite similar to Great Stuff.  My skills at taping, gluing and foaming will be tested in the coming days when we do the first blower door test on the house.

This is the expanding foam tape (a leftover piece) - the right side is about 1 1/2 inches top to bottom at the full expansion.


This is a picture of the same scrap next to a roll containing 6 meters (about 18') of the tape.


This is the water and air sealing tape used on the bottom of the doors and windows.  The yellow strip is a double-faced tape section which has glue on both sides.  The tape is installed with  the lettered side away from the sill and the smooth black side nearest the sill.  

The top tube is the spray-foam while the bottom is the glue.  The foam is applied using a gun very similar to the Great Stuff Pro guns used for their spray foam.  The glue is applied using a standard caulk gun - the plunger end in this case is sealed with a pop-top and then you puncture the other end, screw the applicator tip on and start applying.  This glue is very stiff so we used a Ryobi One Plus power caulk gun to prevent blistering our hands as we applied the glue.

This is the instruction sheet for the foam tape - one thing we found out is that that tape has two different  sides as shown by the two pointers on this sheet.  One side says "AuBenseite" which is translated to outside and the other is "innenseite" which is translated as "inside."  The outside has a special coating that seals it better agains water infiltration.  We actually had a couple windows installed with the tape reversed but the factory advice for that was simple - use some of the glue that we used for the tape to seal the outside of those taped section.
We have two more doors to install so we may be able to get actual pictures of the installation to help understand the process.

 As mentioned earlier in this post, we'll be spray-foaming on Wednesday and as part of that process we'll be conducting our first blower-door test to find any leaks.    The spray foam will be applied to the underside of the  entire roof as well as all the soffits and gable end walls.  We'll also apply the foam to any panel seams and exposed concrete (only at those inside corners where the width of the house narrows).  We've already sealed the outside of the gable end walls and soffits with house-wrap, glue, and tape (a mix of Zip roofing tape, house-wrap tape, and window flashing tape). There are still a few panel joints that need sealing on the outside which we'll do on Monday or Tuesday since we're low on the required caulk for that.

Grading and rough-in inspection prep

This week brought the near-final grading of the property, removal of the silt fence at the south of the cleared area and the setting of 18 1/2 tons of rip-rap for erosion control.

 In addition, there was work done to finish up the HVAC and plumbing in preparation for the rough-in inspection for framing, HVAC, plumbing and electrical which is scheduled for Monday.  The framing crew also worked on the soffit, facia, frieze board, and walls/ceiling of the garage. We haven't taken pictures since they got the walls up on the garage which changes the look significantly and it becomes a very gray house now.  One thing we did notice is there's a perfect space at the inside of the garage where the roof meets the soffit that allows for birds and bats to enter the overhead space of the garage so we'll be blocking all that up with either netting or blocks.  It isn't that we don't want to provide a home for the bats but their droppings would make a nasty mess of that overhead space.  We'll build bat houses for around the property at a later date (the framing crew did have a bat fly out from under the soffit one day while they were working.


Here's the view of the front of the house before the grading was completed on Monday


And here's how it looked after grading.  What isn't evident in this picture is that the water flow continues to go down the slope and across the front of the garage.  The grader put a gravel bar across to slow down the flow and it proved its worth on Tuesday when the rains came.  The water did not wash any of the freshly graded soil away.


That's a pile of 18.5 tons of rip-rap for the erosion control along the South side of the cleared area.


You can see the slope has been cut away slightly here - that was in preparation to remove the posts for the silt fence and then the silt fence.
This is the final grading completed viewed from the opposite side of the clearing.  Note that rip-rap is now placed to slow any water flow that may occur but on Tuesday there was little to no erosion from the rains.

Here's the final grading done under the West  roof over the deck area.  The cement "blocks" (called lugs) on the side will hold the pressure treated ledger board which defines the level of the deck. The opening you see to the right is the French door and the deck will be about 3/4" below that opening.


A little more progress made on the retaining wall - you can see a small bit of the "recurve" where the wall curves back into the hillside where it will terminate.


Another view of the back of the house after the clearing - you can see the two ERV ducts on either side of the opening in the walk-out basement.